So we're back with the second part of the Secret Santa gift. We'll be looking at the inside of the stationery box, and there's a lot there. Let's get started.
Here's the outside, once again:
This is what it looks like when you open it up:
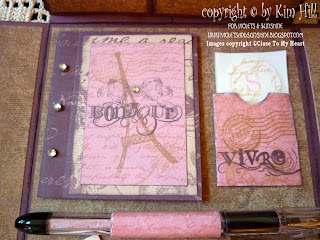
The pockets hold standard, A2 cards and envelopes, along with gift enclosures and/or tags. The panel that lays flat has a little journal that could be used as an address book, a pocket for stamps (I used it for seals instead) and a matching pen. Here's a close-up of the panel:
Next, the cards:
I added six A2 cards and envelopes. The initialed notes do not fold over. I layered Bamboo cardstock cut at 4 1/4 x 5 1/2 inches with Blush and Colonial White cardstock that were cut at 4 x 5 1/4 inches and 3 3/4 x 5 inches, respectively. I ran the Colonial White layer through my Cuttlebug using the Swiss Dots edge folder. The initials are stamped in Cashmere Exclusive Ink on Blush cardstock and layered on scallops cut from pattern paper. Using the corner rounder, I rounded the corners of each layer for a little added interest.
For the fold-over cards, I cut Colonial white cardstock at 8 1/2 x 5 1/2 inches and scored at 4 1/4 inches for the horizontal cards, and at 4 1/4 x 11 inches and 11 inches, scored at 5 1/2 inches for the vertical card. I trimmed the edges of the front of the cards using the Deco Scallop Edger punch by e.k. success and used the same punch to to trim the strip of pattern paper, which measures 2 x 5 1/2 or 4 1/4, depending on the card. I added a strip of pattern paper at the bottom of the inside of the card for contrast. I stamped the greetings in Bamboo Exclusive Ink using the Bonjour stamp set, and "fussy cut" around them. They are layered using dimensional adhesive on little tags I cut using a punch and. (A similar shape can be found on the Artiste and Art Philosophy Cricut cartridges. The shape measures 1 x 2 inches.) I then added Silver Shimmer Trim and Bitty Pearls to complete the cards.
Here's a look at the small pockets and the gift enclosures:
The small pockets are decorated with strips of the Bush cardstock I used on the earlier elements. I added a little flower from a punch from my collection and layered that with a small faceted gem from the Boutique Assortment.
The square cards are 3 x 3 inches. I layered them with La Belle Vie pattern paper and decorated them with layered stamped images from the Jardin stamp set and the Avonlea Cardmaking Workshop On The Go stamp set. The "box fold" card actually measure 3 1/4 x 3 1/4 inches because it layers on a square piece of cardstock cut to those measurements.
The rectangular cards are cut from Colonial White cardstock at 3 x 4 1/2 inches and, and scored and folded at 2 1/4 inches. I stamped the backgrounds in Bamboo and Cashmere Exclusive Inks using the same stamp sets I used for the square cards. The monogram on all the cards is stamped in Blush Exclusive Ink with Token Alphabet using the second generation stamping technique, and layered on 1/2-inch strips of pattern paper. I added some Pearl Opaque Adhesive gems for a little flare.
I created envelopes for these little cards out of Colonial White cardstock.
And that's it!
I hope you enjoyed my little box. Please let me know if you have question.
Have a wonderful holiday!


Wow! great tutorial and inspiration! You have so many details packed into this stationary kit. I love it.
ReplyDeleteYou are right Lynn, there are many details. You should see it in person. It is simply amazing. I feel so lucky.
ReplyDeleteThanks soooo much for sharing the details. This is one over the top gorgeuos piece!
ReplyDelete