The Marketplace @ Violets & Sunshine

Showing posts with label handmade. Show all posts

02 September 2017

Feel(ing) So Blessed!


Hi All! Welcome to the Kraft-y Heart Blog Share featuring Close To My Heart's September 2017 Stamp Of The Month: Feel So Blessed. If you haven't hopped over to see  the incredibly talented Lynn Darda at From My Bungalow yet, don't miss it! She will certainly inspire your creativity! But first, let's take a look at this fantastic new stamp:


I love this stamp set, from the fun fonts to the whimsical images. And the sentiments are not only great reminders, but look beautiful on cards and scrapbook pages alike. HOWEVER, I thought I'd showcase them in a little home decor piece that I created to auction off later this month at the Rose Blossom Operation Smile Crop. (For more on Operation Smile, click here).

Let's take a look:


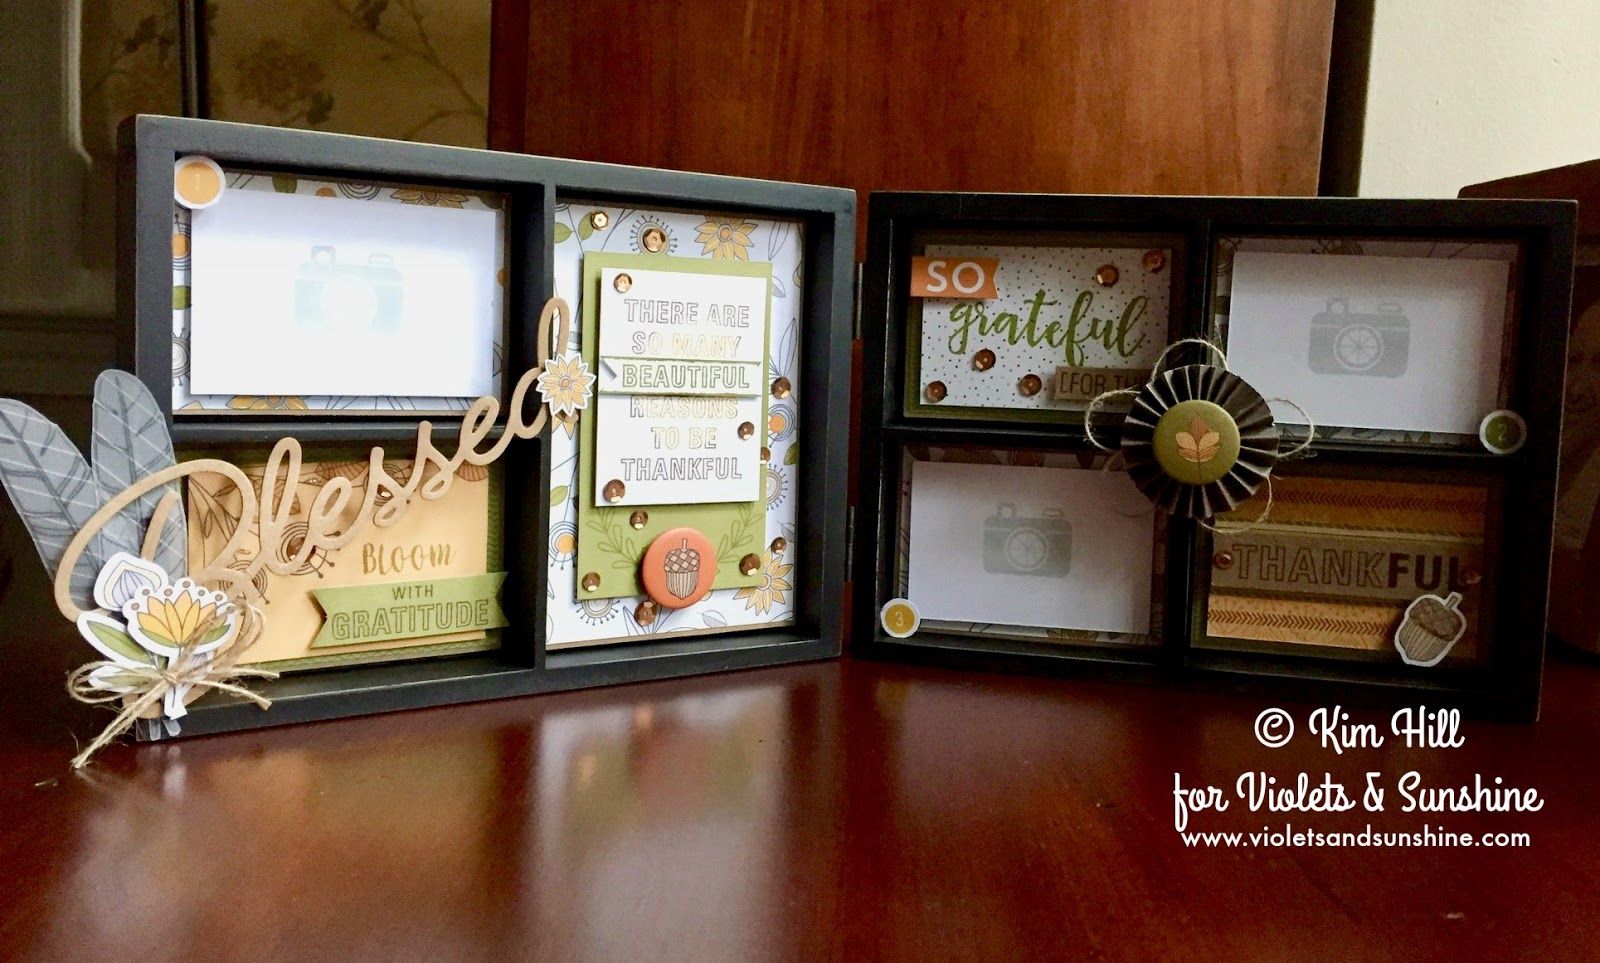
This shadow box frame is decked out for fall and ready to show off 2x3 photos of three of your favorite blessings.

To decorate the frame, I used patterned papers from the new Falling For You paper pack by Close To My Heart, along with embellishments from the Falling For You Complements pack. Here's a closer look: 

For the main sentiment, I inked up the stamp in Saffron ink, then rolled the edges in the new Nutmeg ink and stamped it on White Daisy cardstock. I then stamped the sentiment again in Fern ink and cut out the "Beautiful" and added it to the original sentiment. I popped that up on Fern cardstock that I had stamped with two laurel branches toward the bottom. I popped that up on a panel of Kraft cardstock layered with patterned paper and then popped the whole thing up in the frame. I then finished things off with a badge button from the complements pack and a smattering of bronze sequins from the Bronze Sequin mix.

For the "Blessed" element, I stamped 2 feathers in the new Pewter ink on some scraps of striped vellum and fussy cut them. I attached them to the back of the Blessed die cut from the complements pack and added some flower stickers. I finished the embellishment off with a burlap bow and some Gold Shimmer Pen on the flowers.

To decorate the bottom compartment, I layered Kraft cardstock with patterned paper and then popped a 3x4 card from the cut-apart page in the paper pack onto that. I added the "Bloom" sentiment from the Falling For You Scrapbooking stamp set in Fern ink, and then stamped the "with Gratitude"sentiment from Feel So Blessed in Nutmeg ink on Fern cardstock. I cut that sentiment into a banner and popped it up on the card. I finished it off with more bronze sequins.

 For the left side of the frame, I added 2 spots for photos and two decorative areas. The decorative pieces in each compartment were layered like the two on the right side of the frame, I just changed the sentiments a bit.
For the "So Grateful..." compartment, I stamped "grateful" onto patterned paper in Fern ink and "for this" in Nutmeg ink on Kraft cardstock. I fussy cut the "for this" out and popped it up below "grateful." The "so" is from the complement stickers and is also popped up. I added bronze sequins to finish it off and to tie it in to the elements on the left side of the frame. 

The "Thankful" sentiment is stamped in Nutmeg ink on Kraft cardstock and popped up on patterned paper. I added a little chevron detail to the pattern paper using a stamp from Feel So Blessed and Nutmeg ink. To finish things off, I added two sticker strips above and below "thankful" and two sequins. I popped up an acorn sticker toward the bottom that I had embellished with Gold Shimmer and Liquid Glass.

Finally, I added a little extra something with a paper rosette, a badge button from the complements and a little burlap string. 

Here's the whole project, one more time:

I hope you like this little piece. If you happen to be at the Rose Blossom Operation Smile Crop this month, remember to bid high! Let's make as many people smile as we can! And remember, the Feel So Blessed stamp set is only available during the month of September.

Happy crafting!


14 February 2017

Tuesday Treats: HAPPY VALENTINE'S DAY!

Hi All! Happy Valentine's Day! Just wanted to pop in and share a treat box I made to give to two of my Valentines today.


I created these two boxes using the Thin Cuts Basic Hearts dies, Neenah Solar White 110lb cardstock, and the Polkadot and Woodgrain Kraft Cardstocks from Close To My Heart's Rustic Home Fundamentals paper pack. So let's take a look:


First up is the box for my daughter. I cut two hearts from the Neenah cardstock using the largest of the heart dies and then four from the same cardstock using the heart that is the next size down. I then used the same two dies to cut four large and two of the smaller hearts from the Polkadot Kraft Cardstock. I then used the large Kraft hearts to cover front and back of the large white hearts. I covered the front of one of the smaller white hearts with one of the smaller Kraft hearts and then stacked the remaining three hearts on top of one another, adhered them together, and then covered the front with a craft heart. I inked around the edges of the hearts with Thistle ink. I then cut a strip of the Kraft Cardstock for the sides that measured 1 1/2 x 7 1/4 inches and scored it lengthwise at 1 inch. I added a strong tape to both sides of the paper in the 1/2-inch space between the scoreline and the edge of the paper. I cut thin triangles through the tape up to the score line so that I could manipulate the paper around the smaller 2-layer heart. I then adhered that to one of the larger hearts that served as a base. I added the 4-layer heart to the middle of the second larger heart to create a lid for the box (the 4-layer heart fits into the box and keeps the lid from sliding off.

To decorate the top of the box, I used the smallest heart die in the same die set to cut 2 hearts from Whimsy Fundamentals paper in Thistle. I used Thistle ink to create a patterned paper using the "XO" sentiment from Adore You (CTMH's January 2017 Stamp Of The Month) and double stamped the sentiment from the same set. I then cut out the sentiment using the label die from the Hello Lovely die set. I also tied a bow with Thistle Extra Thick Twine, and adhered one heart, the sentiment and the bow directly to the box. I then popped the other heart up using foam tape.

Here's a look at some close ups of the box:


And here's a look at my son's box:
I created it exactly the same way using the Woodgrain Kraft cardstock and paper from the Adventure Fundamentals paper pack. I also used White Bakers Twine to tie a knot for the top instead of a bow. The sentiment was stamped in Pacifica Ink, which I also used to ink around the edges of box.

Here are some close ups:


And here's a look at the boxes and their lids with the candy inside: (If I were making these to give away to friends, I would use wrapped candies instead of M&Ms.)


Finally, I actually made these to match their Valentine cards. (You can see more about the cards here.)


I think the kids enjoyed receiving them even more than I did making them, if that's possible! They aren't my quickest box, but I love the way they turned out. And I hope you've enjoyed them too. 

As a reminder, tune in tomorrow evening for the upcoming Rose Blossom February Blog Hop. And until then have a Happy & Creative Valentine's Day!


31 January 2017

Tuesday Treats: That's Some Kinda Wonderful!

Hi All! Welcome to another Tuesday Treats. Today's box was inspired by a little Godiva candy box I received at Christmas. This cute little box requires no adhesive, which means you could make a number of them and store them flat for future use. Let's take a look:


To create this box, I first made a template by tracing the shape of the original box onto some 110 lb  Neenah Solar White Cardstock.


I drew in score lines, making sure to get the correct angles, and then cut out the flaps and notches.


I made the box itself from the fabulous Swan Lake Paper by Close To My Heart. For the embellishment, I used stamps from Close To My Heart's Some Kinda Wonderful (Cardmaking) stamp set. I stamped the bird image in Memento Tuxedo Black ink on both the patterned paper and White Daisy Cardstock. I also stamped the speech bubble from the set on White Daisy in the same black ink. I colored the bird on the white cardstock with Copic Markers (Y02, Y06, Y15 and YR4 for the beak) and cut it out by hand, cutting off the feet and little feather. I added it directly to the front of the box, piecing it over the stamped image so that the feet and feather matched up. I added hearts to the speech bubble in Eggplant ink and hand cut the speech bubble from the cardstock. I popped the speech bubble up with foam tape. (This set has matching dies, which I have, that work beautifully. I didn't want the extra little border that the dies leave on this project, so I hand cut the images.) Finally, I added a few dots and lines with my Copic Multiliner to "ground" the bird on the box.

I decided to make this box into a little bag, so I punch two little holes in the top fold of the bag and added some White & Gold striped ribbon for a handle, securing it with a little adhesive.

Here's a look at the back of the bag. The closure is a series of flaps and notches.


And here's a look at what the bag can hold (in addition to Godiva truffles!):


This is such a cute shape! I foresee some Valentine versions of this box coming soon! Until then, let's take one more look at this sweet little treat:


Have a wonderfully creative day!