The Marketplace @ Violets & Sunshine

Showing posts with label beyond awesome. Show all posts

25 June 2016

A Magical Swap (part 2)

Hi All! I thought I'd share the card I made for my friends here in Orlando.


(I'll share a tutorial on this card style later this summer. It's really a whole lot simpler than it looks.)

The card is made from Sapphire cardstock and layered with patterned paper from the Magical paper pack. For the sentiment base layer, I stamped splatters from the Ink Blot stamp set in Honey ink on White Daisy cardstock and adhered it to the pattern paper. I then stamped the "you are" (from the Beyond Awesome stamp se ) in Crystal Blue ink  cut it out with scissors, and popped it up with foam tape  I stamped "some kind of awesome" on a small piece of White Daisy in Cranberry ink, inked the edges of the cardstock in Crystal Blue  and then popped it up with foam tape. And of course, it needed some extra bling, so I added some silver sequins from the Magical Sequins pack and a strip of Silver Foil Tape to the front.

And here are a couple of close-ups:


The coolest thing about this card is that it folds up and fits into a standard A2 envelope! Love that!

Here's a look at the cards packaged and ready to go:


I hope you enjoyed this little pop up card. Stay tuned for a look at some other projects I created for this week of crafty fun!

Have a fantastically creative day!


24 June 2016

A Magical Swap (part 1)

Hi All! I'm sorry to be slow on the posting this week. It's been a full week at the Close To My Heart Convention here in Walt Disney World. I've reconnected with some old friends and made a lot of new ones, we've peeked at and played with new products that are fantastic (can't wait to start sharing them with you!), and have learned a lot about business and mentoring from fellow crafters. 

One of my favorite ways to meet new people is to do card swaps. Basically it's like the old elementary school card trade except you're trading greeting cards (or what have ya) that you've made. I thought I'd share the cards I made with you today. I created 50 of these for the main swap and I'm going home with 50 new cards from some very talented folks from around the world. Let's take a look:


The cards are the same style, but made using different patterns of paper from the Magical Collection  along with layers of Sapphire cardstock  For this first one, stamped the sentiment from the Beyond Awesome stamp set in Crystal Blue ink and added some silver sequins from the Magical Sequins pack. Here's a close-up:


And here's a look at the second card:


Again, it's the same card, but this time I used Cranberry ink  I also added in a strip of Silver Shimmer Trim to both cards for some extra pizazz. Here's a close-up of the second card:


Here's a look at the two together:


Hope you enjoyed a look at these fun little cards! Stay tuned for a look at a second card I made for my friends.

Have a wonderfully creative day!


10 June 2016

Friday Focus: Calypso


Hi All! Welcome to the Friday Focus Kraft-y Hearts Blog Share. Today we're taking a look at the beautiful Calypso collection. Perfect for all your summer layouts, cards and crafting projects, Calypso features bright summer colors with fun-in-the-sun images.

For today's project, I decided to play with the Calypso Workshop Your Way, which includes everything you need to create three 2-page 12x12 layouts, 2 cut-apart pages to create a pocket scrapbooking layout, and enough supplies to create 9 cards. 

Let's take a look at the layouts. These were created according to the suggested instructions in the free PDF download. 


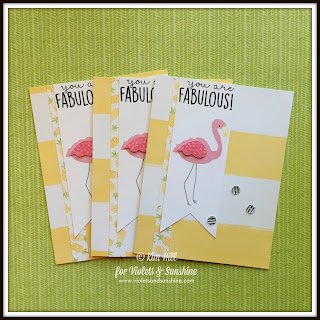
Next up, let's take a look at the cards. I used the suggested layouts, but changed up the stamps. The PDF uses the One In A Melon stamp set, which showcases summer fruits and funny sayings. I actually don't have that set, so I created the cards using the Beyond Awesome, Tickled Pink, and Hawaiian Hibiscus stamp sets.


The cards above features the Beyond Awesome stamp set. I used Memento Tuxedo Black ink for the "You Are..." flag and Cotton Candy and Canary inks for the sentiments.


For this second style, I used the Tickled Pink stamp set. The cute little flamingo is stamped in Pixie and Cotton Candy inks. I used Whisper for the legs and Canary for the beak. The sentiment is stamped in Tuxedo Black ink.


Finally, I used the Hawaiian Hibiscus stamp set on this third card style. I stamped the images in Champagne ink and used my Prismacolor colored pencils to do a little no-line coloring. Let's take a look.


I colored the above flower a little brighter than I had intended and it really didn't go with the pink in the flamingos that are on the front of this paper. So I flipped the paper over to the pineapple side and added a strip of Canary cardstock instead of the flamingo washi tape. I fussy cut the hibiscus and popped it up with foam tape. It took a while to fussy cut the image, so for the next two cards, I stamped the image directly on the White Daisy cardstock:


Again, I stamped the images in Champagne ink. This time, I colored the flowers with lighter shades of pinks and yellows, which match the pink in the flamingos much better. I stamped "Mahalo" on each card using Tuxedo Black ink.

Here are some close-ups of the flowers:


And there you have it! A look at the Calypso collection. You'll be seeing a lot more of it throughout the summer! In the meantime, hop on over and see what inspiring project my über-talented friend Lynn Darda has for you at From My Bungalow.

Have a wonderfully creative weekend!


13 May 2016

Happy Times Friday!


Hi All! Welcome to another installment of Friday Focus. Today we're looking at the Happy Times paper pack by Close To My Heart. This is a limited edition paper pack that has been released to celebrate National Scrapbooking Month, and is free with every $60 purchase. 

I decided to showcase some of the papers by making a few cards. (Shocker, I know...) I paired the papers up with the new Beyond Awesome stamp set. (LOVE. this. set.) So lets take a look:


All of the card bases are Neenah 110 pound white cardstock cut to 7 x 5 inches and scored at 3 1/2 inches to make a top-folding 4 bar note card. The above example shows two of the beautiful foiled papers in the Happy Times pack. (The diagonal striped paper is the zip strip from the large gold striped paper, which I am featuring on another project on Sunday.) I used VersaMark ink to stamp my sentiment on vellum and then heat embossed it in white. I hid a little dimensional adhesive behind the "awesome" banner to give it some lift. The gold foil brings all the bling this card needs.


Love the floral and polkadots on this card. I broke up the layers with a little White Daisy cardstock. The plaid strip is cut from the zip strip at the top of the page. I stamped the sentiment in Sorbet and Canary inks on White Daisy cardstock. I then fussy cut the arrow sentiment and popped it up with dimensional adhesive.


These next two cards feature the front and back of one of the floral sheets along with the zip strip from the same sheet. I used Canary and Juniper inks on White Daisy cardstock for the sentiments and changed them up a little for each card.

(I think this is my favorite sentiment in the whole set. It reminds me of so many of my friends!)

Finally, this card is showcasing one of the 2 ombre sheets in the collection. The ombre begins with a sorbet color and ends in magenta. It's absolutely gorgeous! The back side is the mint green stripe you see in the layers. I stamped the sentiment in Sorbet ink on White Daisy cardstock and added some giant clear sparkles I had in my stash.

Here's a look at the cards together:


Hope you enjoyed this look at Happy Times. Be sure to hop on over and see what inspiring things Lynn has for you at From My Bungalow. And don't forget to stop back by on Sunday for the Rose Blossom Blog Hop. There are a lot more Happy Times to come!

Have a wonderfully creative weekend!