The Marketplace @ Violets & Sunshine

Showing posts with label cards. Show all posts

29 June 2016

A Cute Little Card Box for (Beautiful) YOU! (Part 2: the cards)

Hi All! Welcome to the second part of my card box project. Today we're going to take a look at the cards.


I started with a layer of Juniper cardstock cut at 4 x 5 1/4 inches. I then added a layer of Georgie paper that I had folded "drapery" style. I covered the top edge of the folds with a zip strip from the patterned paper and then finished it off with White & Gold Ribbon. I stamped the sentiments on White Daisy cardstock in Whisper ink. I cut them out using an oval punch and popped them up with foam tape on a scalloped oval punched from Georgie paper  I then popped that up with some thin foam tape  Finally I added the whole thing to a white card base using fun foam for dimension. Because of all the layers and dimension, I was able to fit 4 cards and envelopes in the box comfortably. (I probably could have squeezed in a fifth card and envelope, but I didn't want to run the risk of tearing the cards when I took them out.)

So here's a look at the box and cards together:


Hope you enjoyed this cute little project!

Have a fabulously creative day!
 

20 October 2013

A Little Crafting Fix

So I thought I'd share a secret to a quick little crafting fix: Close To My Heart's Workshops on the Go. The Workshop On The Go collections are perfect when you want (or need) to do some quick crafting projects that look like you spent hours on them. All the paper, embellishments and stamps are included in the workshops. You just need to bring the ink, adhesive and paper trimmer. (In the case of the Laughing Lola card workshop that I'm showing you today, you also need to bring your Cricut and the Artiste Cartridge, though you could fussy cut around the images if you don't have the Cricut.)

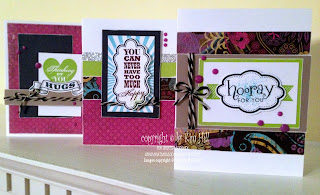
Here are the 3 card designs (you have 15 card bases to make 5 of each design):


Now I made a few changes to the cards (shocking, I know) in order to make them more my own--and to cover up some mistakes. First, the "hooray for you" stamp isn't part of the workshop, it's from the 4 My Friend stamp set. The original card said "cheer up." For some reason, this sentiment struck me as odd. It's almost like a command. Seems to me like the last thing some one who might be down needs is to be commanded to "cheer up." So I switched out the sentiment. 

The second change I made is to the "You can never have too much happy" card. All of the paper strips are sanded at the edges to add texture and interest. I got a little overzealous with my sanding on one of the Pear strips and it tore a bit. I didn't want to waste it, so I covered the tear with a strip of Silver Shimmer trim. I really liked the effect, so I added it to all the other cards in this style as well.  

The "hugs" card was made exactly like the instructions suggested. 

Here are some close ups:


Hope you enjoyed this peek at the Laughing Lola Card Workshop. And remember, if you need a quick crafting fix, Close To My Heart's Workshops On The Go are just the ticket!


18 October 2013

Kraft-y Hearts Blog Share Day 2: Bright & Shiny Things


Hi All! Welcome to Day 2 of the Kraft-y Hearts Blog Share celebrating Christmas in October!

I'm continuing on with my Christmas card theme, but today's inspiration comes from the Pear & Partridge Card Workshop that Close To My Heart released last year. Folks, when you finish your Workshops on the Go, always keep your instructions. They are fantastic sources of inspiration later on!

So for this card, I chose one layout and used it for three different cards. That way I could cut 6 sets of each element rather than having to cut something different for each card. Let's take a look:


For these cards, I once again turned to my White Daisy cards and envelopes value pack and the Sparkle & Shine collection in the Holidays From the Heart Gift Guide. All of the images and sentiments except the tree branch are from the Trim the Tree stamp set, which, like Scandinavian Wishes, coordinates with the Art Philosophy Cricut cartridge. The branch is from the retired Pear & Partridge Card Workshop. I stamped in Juniper, Ruby and Slate Exclusive inks, and used Juniper, Ruby and Slate cardstocks to match the colors in the Sparkle & Shine patterned paper. Did you notice the spiffy bit of bling around the images? I got that done in a snap using the new CTMH Sparkle Holiday Shapes. LOVE it! (Can you imagine how long it would take to do that one rhinestone at a time???) A little silver washi tape finishes the cards off nicely. Another six cards done in less than 30 minutes. I'm on a roll!

Tune in tomorrow to Day 3 of the Kraft-y Hearts Blog Share and celebrate a little more Christmas in October. But, in the meantime, make sure you hop over and see what crafty Christmas goodness Lynn has cooked up in the Bungalow today!


11 October 2012

Kraft-y Hearts October Blog Share (Day 2)


Celebrating the October Stamp Of The Month by Close To My Heart


Hi Folks! Welcome to Day 2 of our Kraft-y Hearts' Blog Share. Aren't Lynn's Avonlea cards AMAZING?! (If you didn't see them yesterday, make sure you stop by and check them out today!)

So today I wanted to share another little gift possibility with you. (Okay, all 3 of my days are going to be about gifts. What can I say, it's my language!)


This little box houses five 3x3 gift enclosure cards with matching envelopes. For a tutorial on how to make the box, you can visit Splitcoaststampers here. I made my box using Cranberry cardstock and papers from the Pear & Partridge paper pack. The top is made from acetate and is edged with Pear & Partridge paper and Cranberry gros grain ribbon. The Treat shape is cut using the Artiste Cartridge at 1 3/4 inches from Colonial White cardstock and is stamped in Cranberry Exclusive ink. I cut a little banner (also from Colonial White cardstock) at 1/2x2-inches and stamped A Very Merry Christmas in Olive Exclusive ink. Both elements of the tag are popped up using foam tape.

Now for the cards! 


This time of the year you can never really have too many gift enclosures on hand. These cards are 3x3, and are cut from Colonial White cardstock. (Cut a 6x3-inch strip and fold it in half. You can get 8 cards from one sheet of 12x12 cardstock!) The Cranberry cardstock layer is cut at 2 3/4-inches square and the Pear & Partridge layer is cut at 2 1/2-inches square. I used the same motif for the front of the card as I used on the front of the box, and popped it up with foam tape over the Cranberry gros grain ribbon. All of the layers except the base are inked around the edges with Cocoa pigment ink from the Basics Mini Pigment ink pads set.  

Here's a close-up of the card:


And here is the card with its matching envelope.


If you don't want to take the time to make a matching envelope, Close To My Heart sells 10-packs of 3x3 envelopes in White Daisy, Colonial White and Kraft. If you do want to make them, you can do so from a 5-inch square sheet of paper. Turn the paper so that it is a diamond and score at 1 7/8-inches on all four sides. (At least that's what I do with the Martha Stewart Score Board. It might be a little different with other scoring systems.)

So I hope you enjoyed Day 2 of our share. Don't forget to stop by the Bungalow for more creative inspiration! See you tomorrow for Day 3 of the Kraft-y Hearts' October Blog Share!

Oh, and if you would like to purchase your own October Stamp of The Month: A Very Merry Christmas, or any other awesome Close To My Heart products, please come by and see me here.