The Marketplace @ Violets & Sunshine

Showing posts with label a very merry christmas. Show all posts

11 December 2012

12 Days of Christmas: Day 11

Hello Everyone! Welcome to DAY 11 of the Kraft-y Hearts 12 Days Blog Share. I can't believe we have only one more day left! (You know this means there's only 13 shopping days left until Christmas, but let's not dwell on that.)

Today's little project is the second part of the teachers gifts we'll be giving this year. It's a tea bag tag.


The tag is actually a library pocket that I cut at 4 inches from Kraft cardstock using the Artiste Cricut cartridge. (That cartridge has certainly earned its keep this season!) I inked around the edges with Cocoa Exclusive ink to give the tag a bit more depth. The border stamp is from the Pear & Partridge Workshop On The Go stamp set and is stamped in Olive Exclusive ink. The tea cup (stamped in Cocoa Exclusive ink) and sentiment (stamped in Cranberry Exclusive ink) are from Close To My Heart's Cup of Cheer stamp set. I added Christmas Red Stickles to the border for some sparkle (I still don't have my Red Glitz Glitter Gel, but it's on my list). "To" and "From" are stamped in Cocoa Exclusive ink using the Very Merry stamp set.

Here's a couple of close-ups:


I added bakers twine to the tag and double-knotted it. I tucked the knotted in into the box and closed the lid. The knot anchors the tag to the box! I thought that was pretty spiffy.


Hope you enjoyed my tea bag tags. I thought I would use them to play along in the Heart 2 Heart Challenge this week. Leave me a comment to be entered in my give away that I'll be conducting on 12/12/12. (The winner will receive a Capture the Date stamp set and a Chocolate Exclusive Ink dye ink pad!)

Make sure you hop on over to From My Bungalow and see the super cute projects created by my talented friend, Lynn Darda.


http://krmhill.ctmh.com/Retail/Product.aspx?ItemID=738

10 November 2012

Yuletide Week In Review


Hi All! Here's the week in review of my cards for the 30 Days, 30 Cards challenge. I thought I would highlight the Close To My Heart products that I used in each of them for you.

(November 4th)
This card uses the Bundled Buddies and Snow Flurries stamp sets (both retired) from Close To My Heart for the animals and trees (stamped in brown staz-on ink). I colored the animals with our alcohol ink markers (Autumn Terracotta, Olive, Indian Corn Blue, Twilight, and Blush) and a white opaque gel pen, and added a little glitter gel to the hats. I sponged the trees with New England Ivy Exclusive ink.

(November 5th)
This card uses the little ornament stamps from the Pear & Partridge Card Kit Workshop, stamped in Bamboo, Gray Flannel, and Cranberry Exclusive inks. (Gray Flannel Exclusive has retired, but Whisper Exclusive ink would work just as nicely.) {be merry} is stamped in Olive Exclusive ink using the Glamour Lower Case alphabet stamped set.

(November 6th)
The sentiment for this card is from the October Stamp Of The Month set and is stamped in Olive Exclusive ink.

(November 7th-front)
(November 7th-inside)
The sentiment on the front of the card is from the October Stamp Of the Month using Chocolate Exclusive ink. I masked off part of the sentiment and added ellipses. The inside sentiment is stamped using words from one of the Art Philosophy Cartridge Collection stamp sets. To tie it all together, I added ellipses, an ampersand, and an exclamation point using a brown marker.

(November 8th)
Here I once again used a sentiment from the October Stamp Of The Month (I hope you were able to get this little gem of a set!) and stamped it in Cranberry Exclusive ink, with a little off-set second generation stamping to give it a vintage 3D look.

(November 9th)
For the sentiment on this card, I used the Glory to God stamp set, stamped in Olive Exclusive ink.

(November 10th)
This card would look gorgeous in Pear & Partridge papers and Cranberry cardstock! The ribbon is Colonial White gros grain (currently on the While Supplies Last list). The sentiment is from the Pear & Partridge Card Kit workshop set and is stamped in Cocoa Exclusive ink. (This stamp set will be a go-to Christmas set for me for a long time. It's worth the kit alone!) I added some Opaque Pearl Gems for a little extra bling. It was such a fun and simple card to make, I'll probably use it to round out the last of my Christmas cards, using Pear & Partridge and probably Dakota papers. I'll post the results when I'm done.

I hope you enjoyed this bit of inspiration. For full details of the cards, visit me at The Feast. To order any of the above products, click on the links or feel free to browse here.


12 October 2012

Kraft-y Hearts' October Blog Share (Day 3)


Celebrating the October Stamp Of The Month by Close To My Heart


Hi Friends! It's Day 3 of our Kraft-y Hearts' Blog Share. I hope you have been inspired to go out and create beautiful things!

Today's project is my favorite of the 3, I think. Again, it would make a nice gift for a hostess or a teacher, or just a friend who could use some extra Christmas tags. (And really, who couldn't? I'm forever running out of tags this time of year!)


This little tag wallet measures 4x3 inches when it's closed and 4x12 inches opened. The base is Colonial White cardstock topped with patterned paper from the Pear & Partridge paper pack. But my favorite thing about this little wallet is the belly band. The band itself is a 1x8-inch strip of Cocoa cardstock. I then added this cute little flower I created using the CTMH Art Philosophy Cartridge. (Don't worry, Artiste gets used in this project, too!) To make the flower, I cut "flower 7" (p. 39) 5 times  in graduating sizes at 1/4-inch increments (from 1 to 2 inches) using Cranberry cardstock. I inked the edges of each layer with Ruby pigment ink to hide the white core. I also used my bone folder to add score lines to the back of each layer and then inked the raised edges in Ruby pigment ink to give the flower more dimension. I curled the petals under  before stacking them together, rotating each layer so that it was slightly off-centered from the one beneath it. I then cut 3 leaves (2 at 1 3/4-inches and 1 at 1 1/4-inches) using the "petal 2" cut (p. 59). The leaves are cut from Olive cardstock and inked with Olive pigment ink. (The mini pigment pads are perfect for inking around the edges of small motifs!) I layered the leaves and attached them to the back of the flower. I then attached the whole thing to the belly band. (When you do this, make sure there is no adhesive on the flower that will attach it to the wallet. As you can see in the photo below, it will tear the paper!) I then used Opaques Pearl Adhesive Gems to add a center to the flower and attached a Colonial White cardstock tag that was cut at 1 3/4-inches using the Artiste cartridge (p. 37). I stamped A Very Merry Christmas on the tag using Cranberry Exclusive ink and edged it in Cocoa pigment ink


Here's what the wallet looks like when you open it up:


The library pockets are from the Artiste cartridge (p. 47), and are cut at 3 inches from Pear & Partridge paper. They are perfect for holding the little tags. The tags are cut from Colonial White cardstock using the measurements given on the Very Merry Christmas stamp set. To save time, I used the auto fill feature on my Cricut and had it cut as many of each tag as it could on one sheet of paper. This gives you a lot of tags to work with! The Christmas tree tag to the far right is stamped in Olive and Cranberry Exclusive inks. The other three shapes are stamped with those two and Chocolate Exclusive inks. (For some reason, I didn't like the Christmas tree stamped in Chocolate. You might though!) The two tags on the right are cut with holes in the top. For the two on the left, I added holes with my Crop-a-dile. I was planning to add gold thread, but am out of it. (ugh!) So that will have to wait. I'll be making another one of these using Kraft cardstock and bakers twine. Can't wait to see how it turns out! 

Here is a picture of the tags in their pockets:


I hope you enjoyed the blog share this month. Don't forget to stop by the Bungalow for beautiful inspiration from Lynn! 


11 October 2012

Kraft-y Hearts October Blog Share (Day 2)


Celebrating the October Stamp Of The Month by Close To My Heart


Hi Folks! Welcome to Day 2 of our Kraft-y Hearts' Blog Share. Aren't Lynn's Avonlea cards AMAZING?! (If you didn't see them yesterday, make sure you stop by and check them out today!)

So today I wanted to share another little gift possibility with you. (Okay, all 3 of my days are going to be about gifts. What can I say, it's my language!)


This little box houses five 3x3 gift enclosure cards with matching envelopes. For a tutorial on how to make the box, you can visit Splitcoaststampers here. I made my box using Cranberry cardstock and papers from the Pear & Partridge paper pack. The top is made from acetate and is edged with Pear & Partridge paper and Cranberry gros grain ribbon. The Treat shape is cut using the Artiste Cartridge at 1 3/4 inches from Colonial White cardstock and is stamped in Cranberry Exclusive ink. I cut a little banner (also from Colonial White cardstock) at 1/2x2-inches and stamped A Very Merry Christmas in Olive Exclusive ink. Both elements of the tag are popped up using foam tape.

Now for the cards! 


This time of the year you can never really have too many gift enclosures on hand. These cards are 3x3, and are cut from Colonial White cardstock. (Cut a 6x3-inch strip and fold it in half. You can get 8 cards from one sheet of 12x12 cardstock!) The Cranberry cardstock layer is cut at 2 3/4-inches square and the Pear & Partridge layer is cut at 2 1/2-inches square. I used the same motif for the front of the card as I used on the front of the box, and popped it up with foam tape over the Cranberry gros grain ribbon. All of the layers except the base are inked around the edges with Cocoa pigment ink from the Basics Mini Pigment ink pads set.  

Here's a close-up of the card:


And here is the card with its matching envelope.


If you don't want to take the time to make a matching envelope, Close To My Heart sells 10-packs of 3x3 envelopes in White Daisy, Colonial White and Kraft. If you do want to make them, you can do so from a 5-inch square sheet of paper. Turn the paper so that it is a diamond and score at 1 7/8-inches on all four sides. (At least that's what I do with the Martha Stewart Score Board. It might be a little different with other scoring systems.)

So I hope you enjoyed Day 2 of our share. Don't forget to stop by the Bungalow for more creative inspiration! See you tomorrow for Day 3 of the Kraft-y Hearts' October Blog Share!

Oh, and if you would like to purchase your own October Stamp of The Month: A Very Merry Christmas, or any other awesome Close To My Heart products, please come by and see me here.


10 October 2012

Kraft-y Hearts October Blog Share (Day 1)


Celebrating the October Stamp Of The Month by Close To My Heart


Hi Everyone! Welcome to Kraft-y Hearts' October Blog Share! 

Are you ready for 
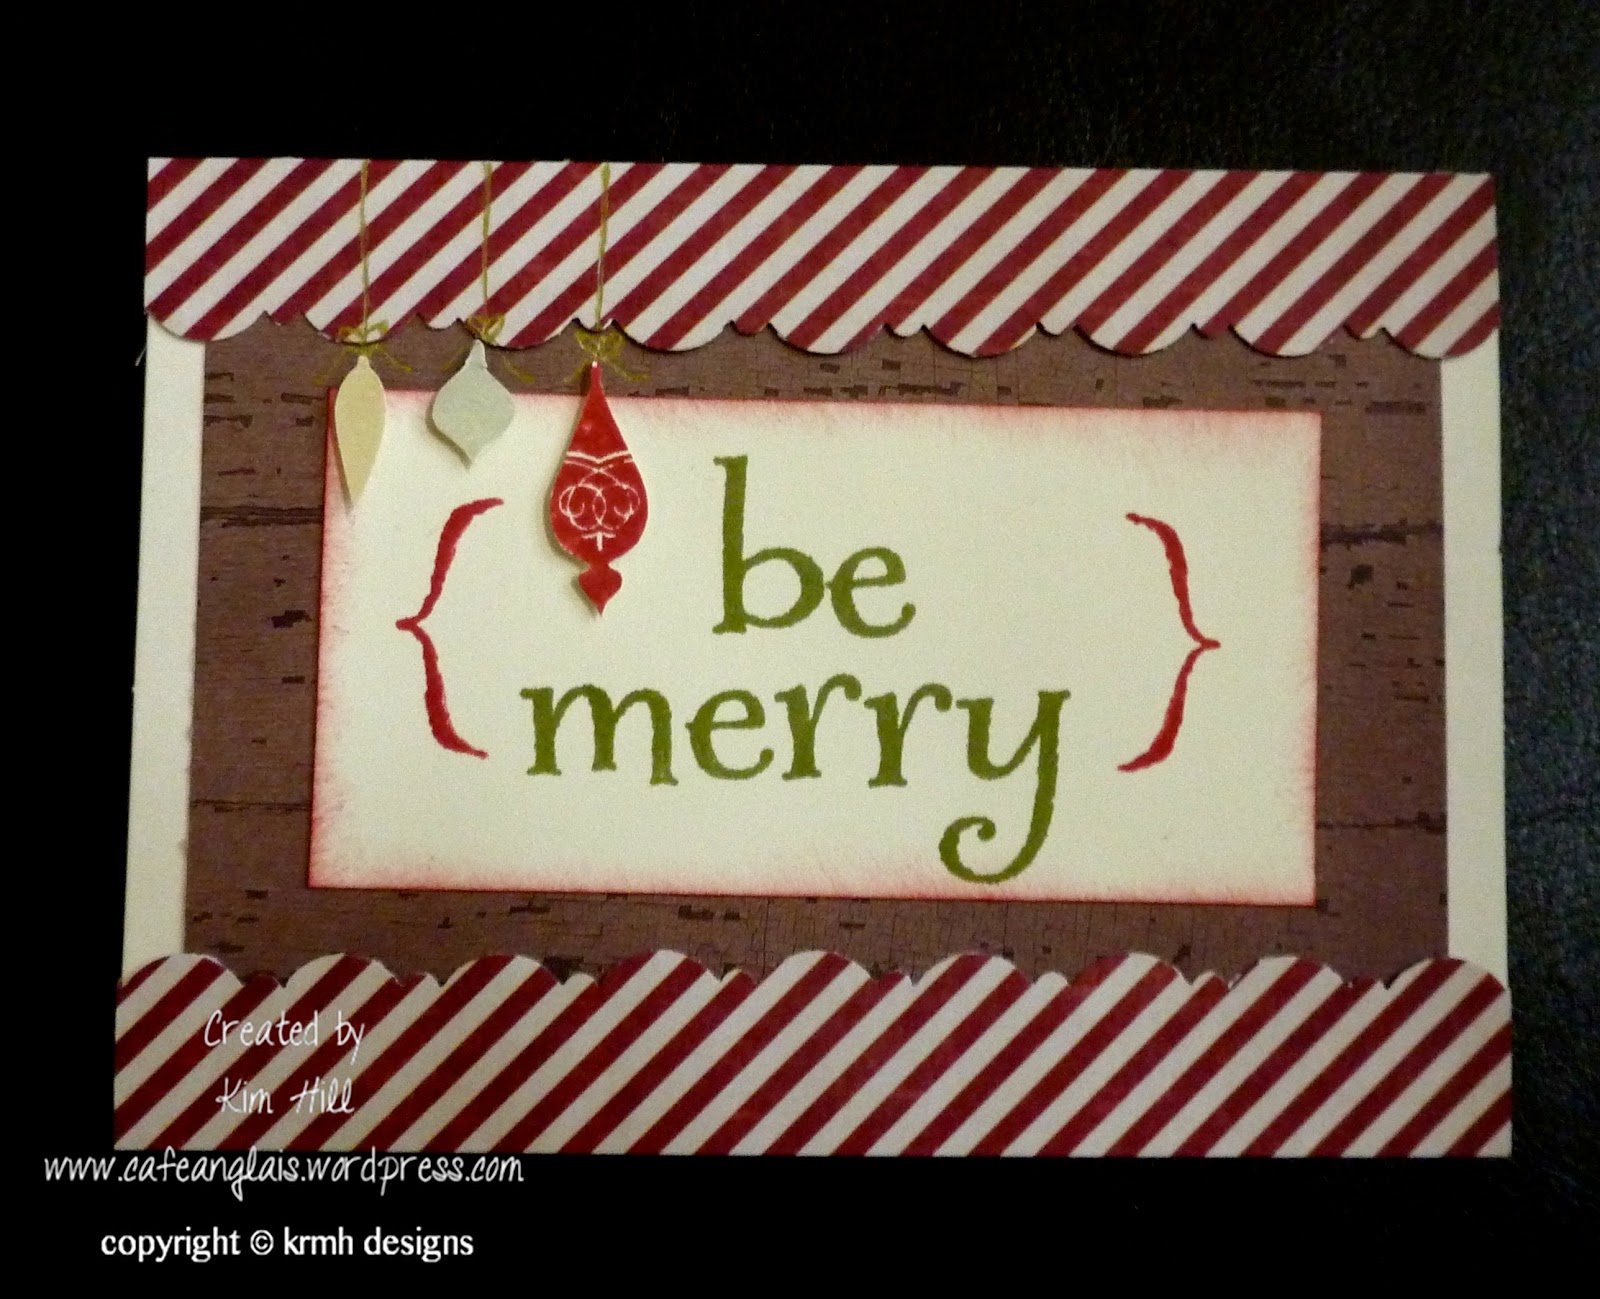
A Very Merry Christmas? That's the theme this month and CTMH's October SOTM will definitely help the Christmas spirit along. Over the next three days Lynn Darda and I will be featuring projects that use the SOTM in creative ways. Remember, this C-size stamp set can be purchased for $5 with your purchase of $50 or more. If you just want the stamp set by itself, no problem. It can be yours for $17.95, which is a bargain in itself given all that this set can do (especially when paired with our Cricut cartridges)!

Now, on with the share!

This first project would make a nice teacher or hostess gift.

The ornament is made from 8 ornament shapes cut from Colonial White cardstock at 3 inches using my Cricut and the Artiste Cartridge Collection. Using the ornament from A Very Merry Christmas, I stamped each shape in Cranberry Exclusive ink, folded them in half and glued the edges together. I used some gold ribbon from my stash as a hanger and add some gold stickles for accent. (I forgot I had Almond Glitz Glitter Gel in my stash. That would have worked beautifully as well.)
Here are some close-ups of the ornament:


I wanted to make something special for housing this little beauty. (After all, presentation does matter!) :) So I created this little box. My inspiration came from Dawn Griffith. You can see her video here.


The box is made from a sheet of Colonial White cardstock and is covered with paper from the Pear & Partridge paper pack. The belly band topper is made from a Colonial White cardstock tag cut at 3 inches from the Artiste Cartridge and stamped with the Do Not Open stamp from A Very Merry Christmas. I then layered the shape which matches the Treat stamp (cut at 1 3/4 inches) to cover the Do Not Open (after all, I someone would want to enjoy this on their tree for the whole season). Both of these tags were stamped in Cranberry Exclusive ink. The Merry Christmas and dots are from the Tag the Occasion stamp set, which has been retired, and are stamped in Olive Exclusive ink. I used the same technique as I used with the ornament to get the dimension. I punched a second hole in the large tag and threaded gold ribbon through both holes to help adhere it to the band. The band is a strip of paper (the back side of what I used to cover the box) that measures 1 x 11-inches.


Here is a picture of the opened box:

Hope you enjoyed today's share. Can't wait to show you what's on tap for tomorrow! In the meantime, don't forget to drop in and see what Lynn is cooking up in the Bungalow! And if you want to purchase your very own October SOTM, you can visit me here.