The Marketplace @ Violets & Sunshine

Showing posts with label birthday boy. Show all posts

20 January 2015

Kraft-y Hearts Blog Share Seasonal Expressions 1 Blog Share: Operation (Birthday) Smile


Hi All! Welcome back to day 2 of the Kraft-y Hearts Blog Share. This month is all about our favorite goodies from the Seasonal Expressions 1 Idea Book.

Today's project features Close To My Heart's Operation Smile Stamp Set: You're The Bomb. For ever "You're the Bomb" stamp set sold, Close to My Heart will donate $3 to Operation Smile. A cute stamp set and a worthy cause. Pretty good combo, right?


So here's the card:


My son turned 14 in December, so this little easel card was just the ticket. (He's a very outdoorsy kid--and also a video gamer... He's a study in contrasts....) The base of this card is Kraft Cardstock cut at 4x8 inches and scored at 4 and 2 inches. The front layer (which stands up when the card is folded into the easel) is 4 inches square. I the layers were made with Twilight, Lagoon and Champagne Cardstocks and patterned paper from the retired Timberline paper pack. (Oh, the sad day this paper retired!!!) I used antiqued copper studs from the Rosewood Mini Medley Accents collection to give it dimension and an industrial feel. The numbers are from the retired color-ready cork collection. The sentiment is stamped in Twilight Exclusvie Ink.

Here's a look at it open:


For a little extra panache, I added a heart to the bomb and a couple of Durables Artisanal Studs to the sentiment.

One more look:


Hope you enjoyed this little card. Now hop on over and see what the amazingly creative Lynn Darda has to share with you at From My Bungalow.

Until tomorrow then....


14 September 2014

#Party Time!


Hi All! Welcome to the Rose Blossom Blog Hop celebrating #30yearsofhappy! If you've hopped over from Created By Barbara, you're in the right place. Did Barbara offer up some amazing inspiration or what???  If you're just joining in the hop, you can find a list of participant blogs at the end of this post.

Now on with the projects!

This month I needed packaging for 4 gift cards--3 for girls and 1 for a guy. I decided to go with a little matchbox that's big enough for a gift card and some candy. (I also made some matching  gift bags with enclosure cards.)

Let's take a look:


For the guy gift set, I used the mustache from #30yearsofhappy to make my own patterned paper, stamping it in Black Exclusive Ink on White Daisy cardstock. (He's having a "Mustache Party," so it's perfect!) The box, bag, and card are made from Black and White Daisy cardstocks. I decided to accent the box and card with other stamps from the same stamp set in Glacier and Goldrush Exclusive Inks. I also added a few black enamel stars--white stars would work too.

Here's some close-ups of the box and 3x3 card:


And here's a look at the bag:


Now let's take a look at the girls' set:


For the girls' boxes, cards, and bags, I used Smoothie cardstock and Chalk It Up paper. I added a little Chalk It Up Picture My Life card to the bottom of the box for some fun reinforcement. The sentiments are in Lagoon and Black Exclusive Inks. Let's take a look:


Here some close-ups and a look at the box when it is opened:


And the bag:


I hope you enjoyed these little gifties. Now hop on over and see what inspiration the oh-so-talented Shelly Nemitz has in store for you. If you want to start at the beginning of the hop (or if you've gotten a little lost), here's a list of the blog participants:

Kim Hill {That's Me}


14 August 2014

Better late than never....

So today's card is late in a couple of ways. First, I made it for my nephew whose birthday was at the end of July. It's mid-August.... so yeah, it's late. I also got the design inspiration from last week's Freshly Made Sketches challenge. Ummm...yeah...it's now too late to link up. Still, I enjoyed making it, so thought I'd post it. And after all...better late than never, right?

The card base is White Daisy cardstock cut at 5 x 10 inches and scored at 5 inches. (FYI: square cards need extra postage.) The three colored cardstocks are from the May National Scrapbooking Month special paper pack: Free To Be. All three have very subtle geometric resist patterns on them. The sentiment is stamped on White Daisy cardstock in Lagoon and Chocolate Exclusive Inks. For the boarder I used a retired back ground stamp and stamped it in multiple directions. The other sentiments are from the Reel Life stamp set and some other retired stamps that I have in my stash.

Here are some close-ups:

For the envelope, I cut a 5x7-inch envelope down to 5x5 size and added a flap in matching patterned paper so that the card would have a nice square envelope to match. (This is when I found out that square cards require more postage...) Here's the card with its envelope:

And here is one more look:

Hope you enjoyed my belated little card. I'm sure my nephew will like it and that all will be forgiven when he pulls out the plastic gift card that's inside....


17 June 2014

Kraft-y Hearts Blog Share Day 2:


Hi All! Welcome to Day 2 of the Kraft-y Heart's June Blog Share. Today features another creation for "him" that was inspired in part by this lovely card that Lynn created last Friday. And wasn't that a FABULOUS Father's Day Card yesterday?! Lynn's an amazing artist!

So on to today's project. Over the weekend, we had several parties to attend (lots of people born in June). As always, I wanted to make the cards (or in this case, the gift card holders) a little extra special. Using this tutorial, here's what I came up with:


For this fun card, I used the last scraps of my Later Sk8r paper and assortment pack. (The paper pack is retired, but you can still get the awesome patterns in the Later Sk8r Picture My Life kit, which has some fantastic journaling cards in it that are perfect for using on greeting cards and scrapbook pages if you're not into the segmented scrapbooking scene.) Anyway, I created the patterned paper for the base of the card using Slate cardstock and stamps from the Later Sk8r Workshop On The Go stamp set (which is retired). I randomly stamped the images in Outdoor Denim Exclusive ink using 1st and 2nd generation impressions. You can see it a little better in this image:


For the belly-band, I used a 1 1/4 x 11-inch strip of patterned paper and added layers of White Daisy, Slate, and Pear cardstocks along with patterned paper as the focal piece. I stamped "Let's Celebrate!" from the June Stamp Of The Month (Kaboom) in Outdoor Denim and Lagoon Exclusive inks. I then fussy-cut the banner from the Lagoon image and adhered it to the card over the Outdoor Denim image. I stamped "YOU" using the July Stamp Of The Month in Outdoor Denim ink on White Daisy cardstock. I then layered it onto Pear and Lagoon cardstocks, popping each layer up with dimensional adhesive. The gears and star is from the Later Sk8r assortment pack.

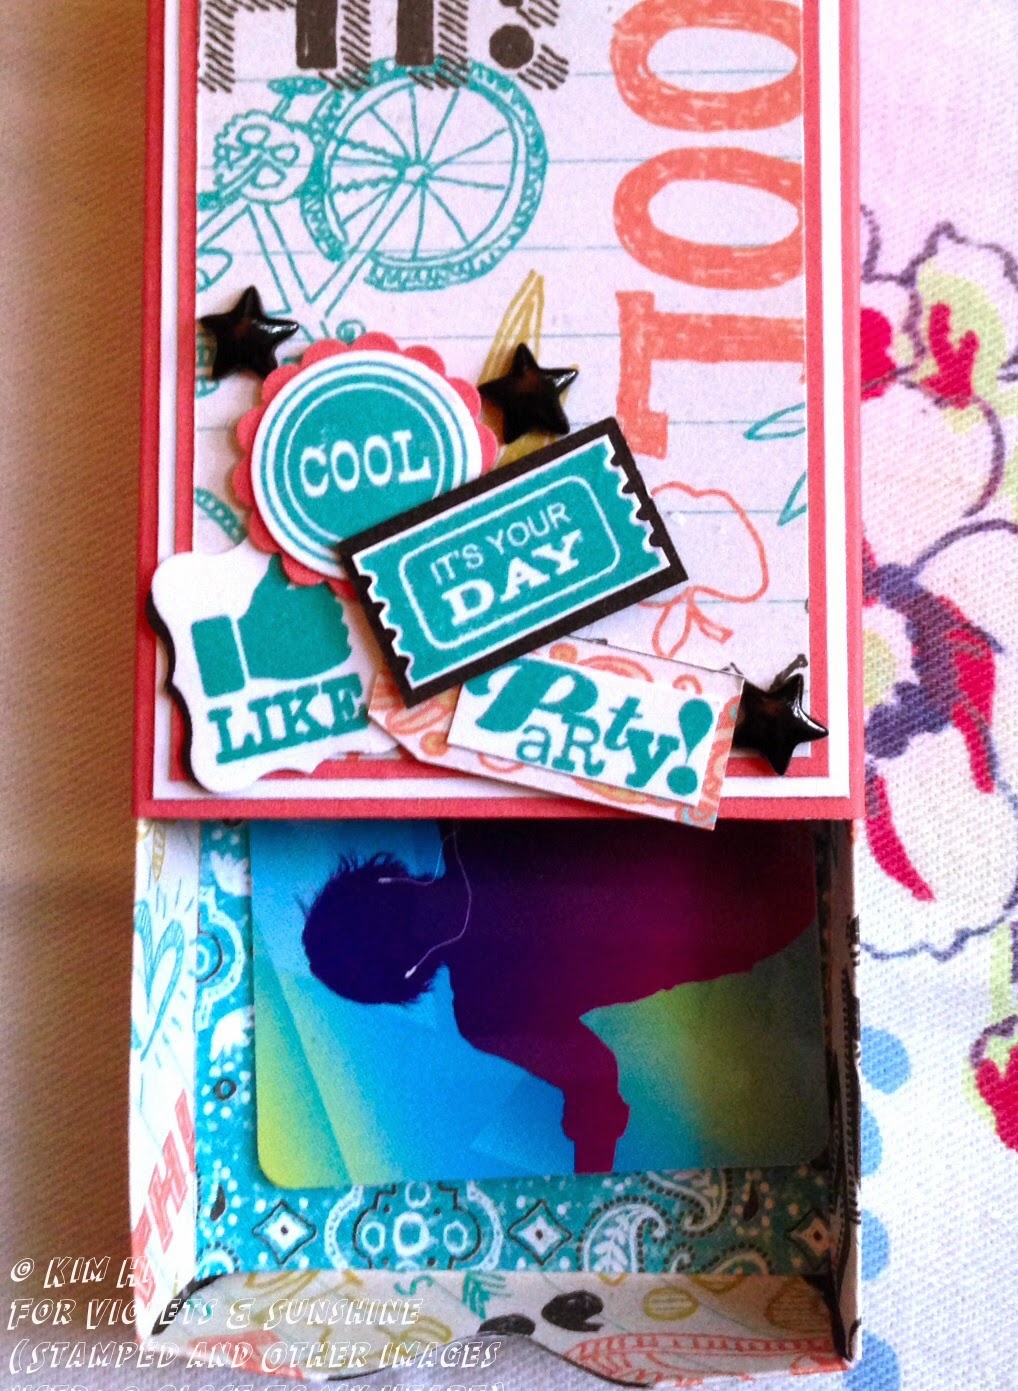
Here are a few close-ups:


Now, let's take a look at the inside:


The inside is covered in Later Sk8r patterned paper and White Daisy cardstock. The "You're the Bomb" sentiment is from the June Stamp Of The Month and is stamped in Lagoon Exclusive ink on White Daisy cardstock. "Happy Birthday" is from one of the stamp sets in the Artiste Cricut Collection (the banner coordinates with the cartridge), and is stamped in Outdoor Denim

Here's a close up of the sentiment:


And here is the card and it's belly-band once again:


We also had a Bat Mitzvah this weekend, so I made a girl version of this card using Gypsy cardstock and (retired) Sarita paper and stamps from a retired Workshop On The Go card kit.  I also changed the orientation of the card to vertical.  Here's a little collage of that one:


I hope you enjoyed the gift card project for today, and the Kraft-y Hearts Blog Share for June. Don't forget to stop by From My Bungalow and see what the lovely Lynn Darda has for your inspiration today.


20 June 2013

Time to play in the Rose (Blossom) Garden!


Hi All! I hope your summer is off to a fabulous start! We're at the Eastern Shore (MD) this weekend enjoying a little quality time for Father's Day. The count down to our trip to Florida (and the Close To My Heart National Convention!) is in full swing.

Today is "Play in the Garden" day here at Violets & Sunshine. Are you ready for another challenge? It's time to make something fun using the Birthday Boy key on CTMH's Artiste Cricut Cartridge. As usual, I tried to think outside the cartridge box on this one, and here's what I came up with:


So what do you get when you turn a start-spangled party hat upside down? Why the perfect little patriotic wall pocket of course! I cut the party hat at "fit to page"from CTMH Glitter Paper, and then cut the same size from White Daisy cardstock to use as a liner. I glued the two together with wet glue for a very sturdy wall pocket. (You will want to use hot glue some other strong adhesive when you make it into a cone.) I cut the large stars from White Daisy and Cranberry cardstocks and the Outdoor Denim patterned paper from our Tommy collection. Each color of star was cut at 3, 3.25 and 3.5 inches. I layered the larger two together using wet glue and added a white pipe-cleaner between the layers. I then added the final star with dimensional adhesive and accented it with a little bit (or a lot...) of Silver Glitz. I cut the banner from Glitter Paper using "fit to page" and then sized it down in .25-inch increments and cut it again from Cranberry cardstock, Tommy paper and White Daisy cardstock. I layered the pieces and folded one end around a bamboo skewer so that it would look like a flag. Before adhering it to the skewer, I stamped the word "Freedom" in Outdoor Denim Exclusive Ink using the Urban Alphabet stamp set. I then adhered the flag to the skewer and wrapped the skewer with pipe-cleaners so that it matched the stars. I added extra stars to the flag that were left over from the hat cutouts. I used Color Ready Seam Binding for a hanger, which I tied through the holes that are already cut in the hat for just that purpose. I added some red crinkle paper and some red, white & blue bakers twine from my stash to finish it off. 

Here are a few close ups:


And here it is proudly hanging on my backdoor. (It's not easy taking a picture of something hanging on a glass door!)


 I hope you are inspired by my little patriotic party-hat-turned-wall-pocket. Don't forget to play along with us in the Rose Blossom Garden. The challenge winner this month will take home the fantastic "Perfect Fit Dad" stamp set.
Is that fun, or what?!

Look forward to seeing all the fun creations you can come up with!