The Marketplace @ Violets & Sunshine

Showing posts with label christmas. Show all posts

19 December 2013

Kraft-y Hearts Blog Share: Gift-spirations Day 1


Hi Folks! The Kraft-y Hearts decided to share a little early this month in hopes of offering you a few simple, last-minute gift ideas. I don't know about you, but it seems like my gift list keeps growing and growing. We have teachers, coaches, neighbors, friends, family, hostess gifts--and the list goes on. It's always nice to have an arsenal of nice, inexpensive little gifts on hand for those last minute needs.

Today's project is a departure from the norm for me. I decided to forgo paper and work with fabric. (I know, right?!) So my first little gift--perfect for teachers and friends--is a little tissue cover made with Close To My Heart's Sparkle & Shine Textile pack. 


These little holders are much easier than they look. There are some great tutorials on the web. (I used this one, minus the corner tuck.) Even with my relatively novice sewing machine skills, I was able to knock out seven covers in about 2 hours one evening. The Sparkle & Shine Textile pack gives you enough fabric for about 9 tissue covers. I alternated the outer and lining fabrics so that I had 6 different styles.

Here are the finished products:


Not bad for someone who hasn't sewn on a sewing machine more than twice in the last 30 years! If you wanted to conserve fabric to make more, you can cut the lining and outer fabrics to the same size and forgo the little contrasting edge at the opening. (I like that look, though, so I splurged!) 

So there you go. A little last-minute gift that everyone can use! Now for more gift-spiration, make sure you stop over at From My Bungalow to see what lovely ideas the super talented Lynn Darda has for you!

See you tomorrow for another gift-y little share!


18 December 2013

A Christmas Mini (part 3)

Hi All! Welcome to part 3 of the Christmas mini share. We'll finish up looking at the last pages today. If you missed the previous posts, you can find them here, here, and here.

Page six was cut from Frosted pattern paper. "merry" is cut out of the page, but since it's pattern paper, I wanted to reinforce it a bit. We'll take a look at that when we look at the back of the page. For the photo mats, I added piece of Frosted pattern paper and then used a photo mat from Artbooking as an overlay. I didn't glue the whole thing down so that I could slide 2x2-inch photos in later. The little tag is from the Frosted Stickease assortment. I inked around the edges of everything with Saddle Exclusive ink and added strips of tan glitter paper for sparkle. I also added a little star sticker and blue sparkle to highlight "merry."


Here are some close-ups"


The back of the page is designed to display a 5x7-inch photo. I used a strip of Frosted paper as both contrast on the back page and reinforcement for the "merry on the front. For interest, I used the scalloped border punch on the patterned paper and then inked everything with Saddle Exclusive ink. For the embellishment, I combined a sticker from the Frosted Stickease assortment, a snowflake punched from tan glitter paper and sections of a Frosted zip strip.  The photo mat was cut from Kraft cardstock.


The seventh page was cut from Frosted Grey cardstock (exclusive to the Frosted Paper pack). I cut the page down a bit to make sure that "christmas" was protected by the album covers. I've left this page without embellishment because I haven't decided if it's going to house pictures or Christmas cards. We'll see. But I do love the "word-on-the-edge" pages!


The eighth page is cut from Kraft cardstock. (I used the holly and berries cut-outs on an earlier page.) The holly can really stand on its own as an embellishment, so I just added a zip strip for interest.


Here's a close-up of the holly cut:


For the back of the page, I added a large piece of Frosted patterned paper, which also anchors the holly on the front. (Love the double duty this paper does!) For embellishment, I added strips of tan glitter paper and a strip of Frosted pattern paper, along with snowflakes punched from tan glitter paper. I also inked around the edges of the paper and page with Saddle Exclusive ink.


Here's a close-up of the embellishment:


Finally, let's take a look at the inside back cover. If you've been following this blog, then you know that I love pockets. There's no way I could make a Christmas mini and not add a pocket! This pocket is a mini page from the baby album in Artbooking cut from Frosted paper. I folded it a little differently to make it into a coin-style envelope. I inked around the edges in Saddle Exclusive ink and adhered it to the back cover with very strong adhesive.


Here's a look at it opened:


And there you have it! My 2013 Christmas Mini Album. I hoped you enjoyed it! Be sure to tune in the rest of the week for the upcoming Kraft-y Hearts Blog Share. I'll be featuring some not-to-be-missed simple, last-minute gift/stocking stuffer ideas.


17 December 2013

A Christmas Mini (part 2)


Hi All! Welcome back to day two of my Christmas Mini pages. If you missed the cover and/or the first couple of pages you can find them here and here. Now on with the show….


The third page is an under cut page with sporting a cut-out "25." I used Kraft cardstock for the page and inked the edges with Saddle Exclusive Ink. I used stickers from the Frosted Stickease assortment and tan glitter paper to decorate the page and to give it more dimension.

Here's a close-up:


The ornament is cut from tan glitter paper using the Artbooking cartridge. I couldn't resist adding a little light blue sparkle to the smallest snowflake. (Is there such a thing as too much bling? I think not!)

To get the most from this page, I decided to add photo mats to the back that could showcase 3x3 photos. The beauty of double-sided paper is that the top photo mat also provides a beautiful background to the "25" on the front. I also used my snowflake punch, Frosted paper, blue sparkles, and Frosted Stickease to add just a little something extra to the page without taking up too much room.


Here's a couple of close-ups of the embellishments:


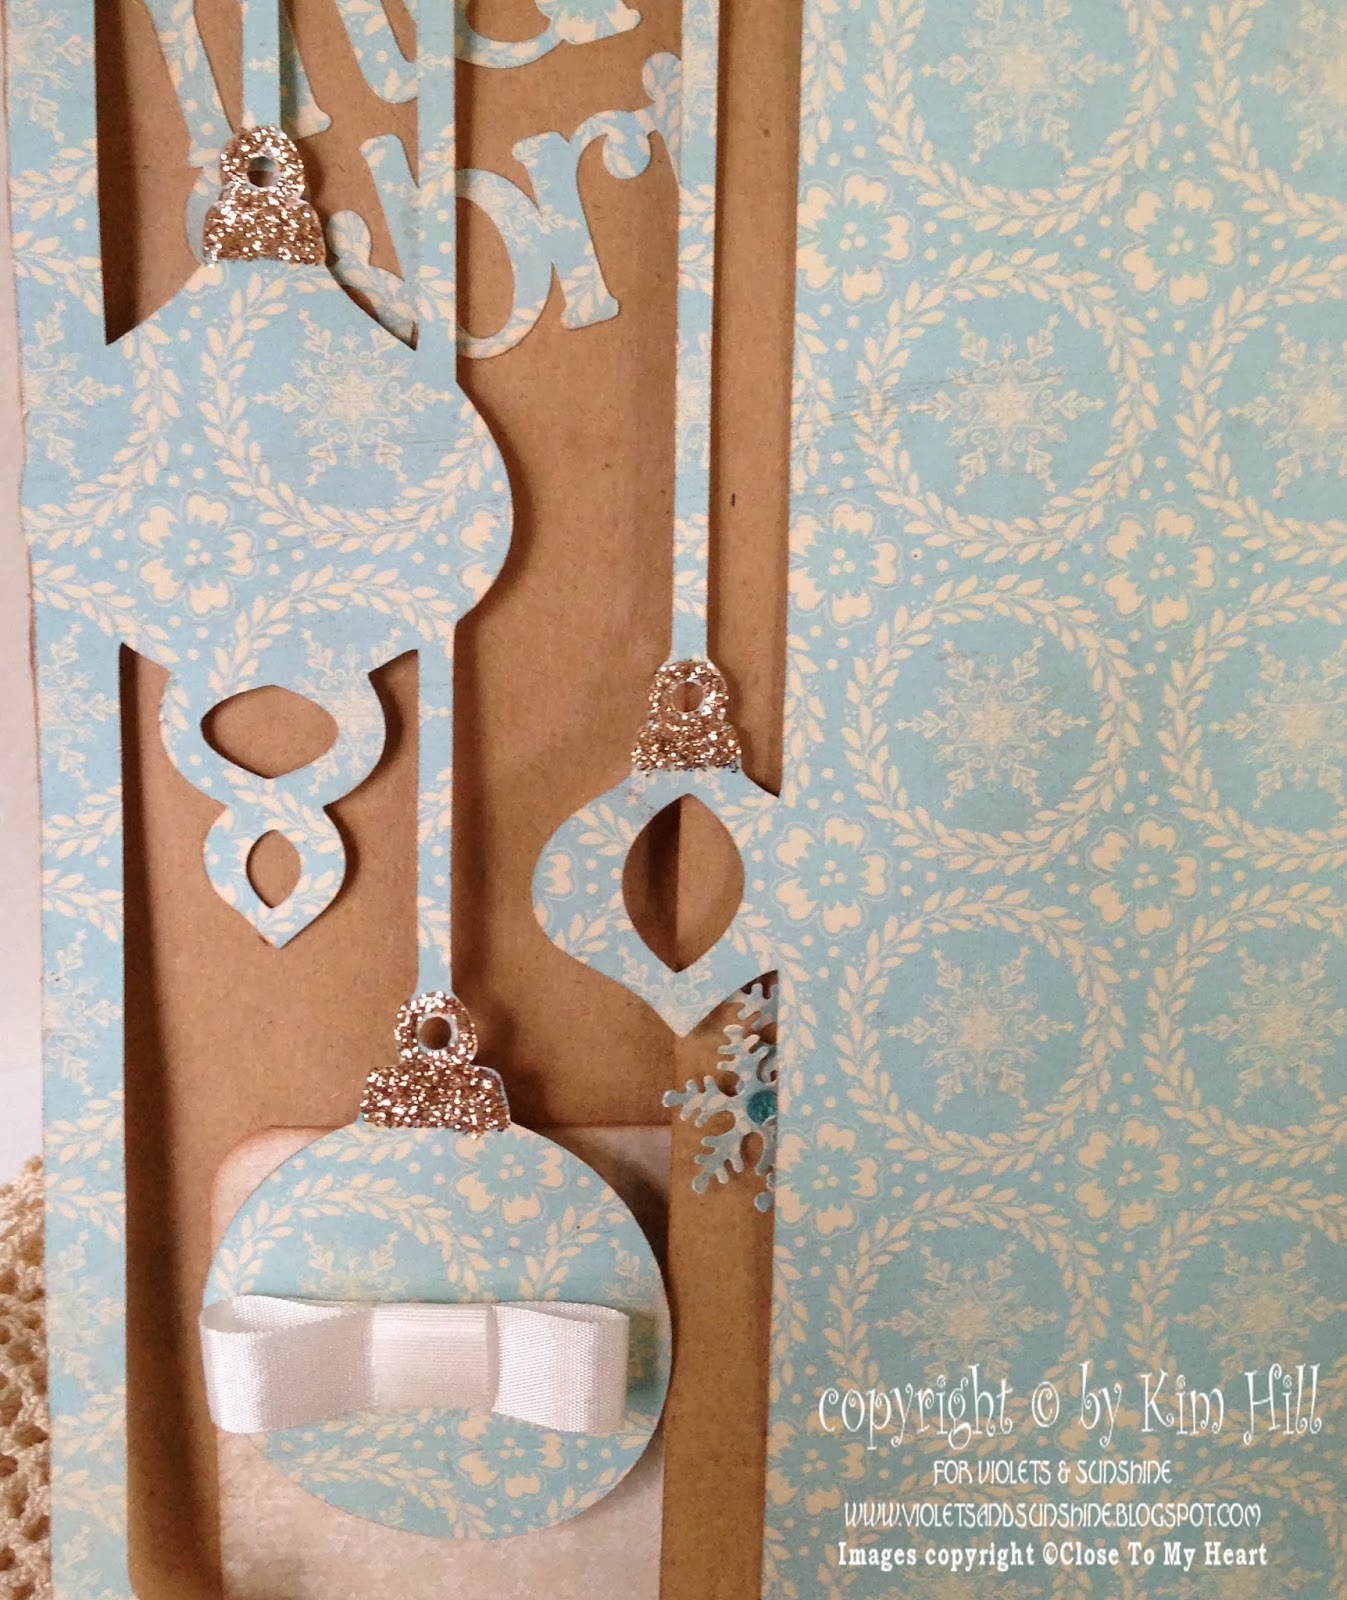
The fourth page is one of my favorite cuts. I decided not to layer it over a base page (which is how it's presented in the Artbooking handbook) so that you could see the page behind it. Also, because the pattern in the paper is rather busy (though beautiful), I didn't think it needed much embellishing. To that end, I added a little Almond Glitz Glitter Gel to the ornaments, along with a sticker and sparkle and some Color Ready Seam Binding Ribbon. I also inked around the edges of the page and the ornaments with Saddle Exclusive Ink to make them pop against the background of the next page.


Here are some close-ups of the ornaments:


Here is the back side of the page. I think this is my favorite pattern in all the Frosted papers (though it's very hard to choose). Again, I kept the embellishing to a minimum in order to let the paper speak for itself.

Okay, so one last page before we go today. The fifth page is a standard base page cut from Frosted Turquoise paper (exclusive to the Frosted paper pack).  To embellish this page, I added a holly spring and berries that were left over from cutting another page (which I will show you tomorrow). The holly is cut from Kraft cardstock to which I added Almond Glitz Glitter Gel for sparkle. I layered that on top of a strip of Frosted pattern paper for an elegant and simple bit of embellishment.


Here is a close-up of the holly:


The back of the page is embellished with ornaments and "Believe" all cut from Artbooking. "Believe" was cut from both Colonial White cardstock and Frosted paper. I layered them to help the word pop off the page. The base of the ornaments are cut from Frosted paper and their embellishments are from tan glitter paper. The top ornament is embellished with the "negative" of the embellishment cut and a blue sparkle.


Here are a couple of close-ups:


I hope you are enjoying a tour of the Christmas mini. We'll finish looking at the last of the pages tomorrow. Until then, have a wonderful day!


19 October 2013

Kraft-y Hearts Blog Share Day 3: Merry & Bright


Hi All! Welcome to Day 3 of the Kraft-y Hearts' October Blog Share. Can you believe it's the last day already?! (Me either!)

Today's project is a little home decor piece I put together for you:


The base of this piece is one of the 6x6 canvas display frames by Close To My Heart. I covered the face of the canvas with paper from the Sparkle & Shine collection. (Love that silver hounds tooth.) The Merry and Bright sentiment is from the Sparkle & Shine Workshop On The Go stamp set. I stamped the sentiment in Ruby ink on White Daisy cardstock cut at 2 1/2 inches using the coordinating shape on the Art Philosophy Cricut cartridge. For the Candy Stripe and Ruby layers, I increased the cutting sizes by 1/4 inch for each layer. The little flags under the sentiment are stamped in White Daisy ink on Ruby, Juniper, and Slate cardstocks. The sentiments are from the October Stamp of the Month: Scandinavian Wishes. The large embellishment in the corner is made from gross grain ribbon from my stash and embellishments from the Sparkle & Shine assortment pack. The two long flags ("Celebrate the Season" and "Winter Wonderland") are cut from one of the Sparkle & Shine zip strips.  Finally, I added small Sparkle Flourishes and red rhinestones to give it a little extra sparkle and shine. To finish the edges of the canvas, I painted them silver and added a little ribbon that matches the front.

Here are some close-ups:


I hope this little canvas brightens your day! Thanks for joining us for this month's Kraft-y Hearts Blog share. Be sure to stop by From My Bungalow and see what beautiful inspiration the amazingly talented Lynn Darda has for you!

Enjoy the weekend!


11 December 2012

12 Days of Christmas: Day 11

Hello Everyone! Welcome to DAY 11 of the Kraft-y Hearts 12 Days Blog Share. I can't believe we have only one more day left! (You know this means there's only 13 shopping days left until Christmas, but let's not dwell on that.)

Today's little project is the second part of the teachers gifts we'll be giving this year. It's a tea bag tag.


The tag is actually a library pocket that I cut at 4 inches from Kraft cardstock using the Artiste Cricut cartridge. (That cartridge has certainly earned its keep this season!) I inked around the edges with Cocoa Exclusive ink to give the tag a bit more depth. The border stamp is from the Pear & Partridge Workshop On The Go stamp set and is stamped in Olive Exclusive ink. The tea cup (stamped in Cocoa Exclusive ink) and sentiment (stamped in Cranberry Exclusive ink) are from Close To My Heart's Cup of Cheer stamp set. I added Christmas Red Stickles to the border for some sparkle (I still don't have my Red Glitz Glitter Gel, but it's on my list). "To" and "From" are stamped in Cocoa Exclusive ink using the Very Merry stamp set.

Here's a couple of close-ups:


I added bakers twine to the tag and double-knotted it. I tucked the knotted in into the box and closed the lid. The knot anchors the tag to the box! I thought that was pretty spiffy.


Hope you enjoyed my tea bag tags. I thought I would use them to play along in the Heart 2 Heart Challenge this week. Leave me a comment to be entered in my give away that I'll be conducting on 12/12/12. (The winner will receive a Capture the Date stamp set and a Chocolate Exclusive Ink dye ink pad!)

Make sure you hop on over to From My Bungalow and see the super cute projects created by my talented friend, Lynn Darda.


http://krmhill.ctmh.com/Retail/Product.aspx?ItemID=738

09 December 2012

12 Days of Christmas: Day 9


Hello All! Welcome to DAY 9 of the Kraft-y Hearts Blog Share. I hope you've been inspired to whip up some crafty goodness for the holidays this year!

Today's home decor project uses the My Creations Star by Close To My Heart.


The star comes in white ready for decoration. CTMH has a template that you can print out that allows you to easily cover the star to match your decor. To make this one, I used Pear & Partridge paper. (A single sheet will cover the star with a bit left over.) Before covering, I inked the edges of the star and the paper pieces using Cashmere Exclusive ink. I then adhered the pieces to the star. For the rosette in the middle, I cut two strips of coordinating patterned paper at 2 x 12 inches, scored both at every 1/2 inch and then accordion-folded them. I attached the two strips together to form a ring, and collapsed it in the middle to form the rosette. I used my hot glue gun and two 1-inch circles to secure it. (I've found with larger rosettes, hot glue is a must.) If you want more elaborate edges in your rosettes, you can find several options on the Artiste Cartridge, which is also the cartridge I used to cut the large snowflakes that I layered behind the rosette. The banner is cut by hand from a piece of Kraft cardstock and layered on coordinating patterned paper. I stamped the background in a snowflake pattern using the Pear & Partridge Workshop On The Go stamp set and Bamboo Exclusive ink. "Peace" is stamped in Cashmere Exclusive ink using the Trinity Alphabet stamp set. The small snowflakes were made using a retired punch by Creative Memories (but you could also use the Artiste or Art Philosophy Cricut cartridges to make them). I added some Pearl adhesive gems and a little Almond Glitz for a little extra pizazz. The red pearl stick pins are from my stash.

Here are a couple of close-ups:


I hope you enjoyed my little star, and are inspired to go out and create your own. CTMH has some fantastic 3D creative pieces that are simple to embellish and make wonderful gifts. Don't forget to leave a comment to be entered to win some fabulous blog candy from me (a Capture the Date stamp set and a Chocolate Exclusive ink pad!). And you definitely want to go and see what Lynn has been up to at From My Bungalow.