The Marketplace @ Violets & Sunshine

Showing posts with label christmas mini album. Show all posts

18 December 2013

A Christmas Mini (part 3)

Hi All! Welcome to part 3 of the Christmas mini share. We'll finish up looking at the last pages today. If you missed the previous posts, you can find them here, here, and here.

Page six was cut from Frosted pattern paper. "merry" is cut out of the page, but since it's pattern paper, I wanted to reinforce it a bit. We'll take a look at that when we look at the back of the page. For the photo mats, I added piece of Frosted pattern paper and then used a photo mat from Artbooking as an overlay. I didn't glue the whole thing down so that I could slide 2x2-inch photos in later. The little tag is from the Frosted Stickease assortment. I inked around the edges of everything with Saddle Exclusive ink and added strips of tan glitter paper for sparkle. I also added a little star sticker and blue sparkle to highlight "merry."


Here are some close-ups"


The back of the page is designed to display a 5x7-inch photo. I used a strip of Frosted paper as both contrast on the back page and reinforcement for the "merry on the front. For interest, I used the scalloped border punch on the patterned paper and then inked everything with Saddle Exclusive ink. For the embellishment, I combined a sticker from the Frosted Stickease assortment, a snowflake punched from tan glitter paper and sections of a Frosted zip strip.  The photo mat was cut from Kraft cardstock.


The seventh page was cut from Frosted Grey cardstock (exclusive to the Frosted Paper pack). I cut the page down a bit to make sure that "christmas" was protected by the album covers. I've left this page without embellishment because I haven't decided if it's going to house pictures or Christmas cards. We'll see. But I do love the "word-on-the-edge" pages!


The eighth page is cut from Kraft cardstock. (I used the holly and berries cut-outs on an earlier page.) The holly can really stand on its own as an embellishment, so I just added a zip strip for interest.


Here's a close-up of the holly cut:


For the back of the page, I added a large piece of Frosted patterned paper, which also anchors the holly on the front. (Love the double duty this paper does!) For embellishment, I added strips of tan glitter paper and a strip of Frosted pattern paper, along with snowflakes punched from tan glitter paper. I also inked around the edges of the paper and page with Saddle Exclusive ink.


Here's a close-up of the embellishment:


Finally, let's take a look at the inside back cover. If you've been following this blog, then you know that I love pockets. There's no way I could make a Christmas mini and not add a pocket! This pocket is a mini page from the baby album in Artbooking cut from Frosted paper. I folded it a little differently to make it into a coin-style envelope. I inked around the edges in Saddle Exclusive ink and adhered it to the back cover with very strong adhesive.


Here's a look at it opened:


And there you have it! My 2013 Christmas Mini Album. I hoped you enjoyed it! Be sure to tune in the rest of the week for the upcoming Kraft-y Hearts Blog Share. I'll be featuring some not-to-be-missed simple, last-minute gift/stocking stuffer ideas.


17 December 2013

A Christmas Mini (part 2)


Hi All! Welcome back to day two of my Christmas Mini pages. If you missed the cover and/or the first couple of pages you can find them here and here. Now on with the show….


The third page is an under cut page with sporting a cut-out "25." I used Kraft cardstock for the page and inked the edges with Saddle Exclusive Ink. I used stickers from the Frosted Stickease assortment and tan glitter paper to decorate the page and to give it more dimension.

Here's a close-up:


The ornament is cut from tan glitter paper using the Artbooking cartridge. I couldn't resist adding a little light blue sparkle to the smallest snowflake. (Is there such a thing as too much bling? I think not!)

To get the most from this page, I decided to add photo mats to the back that could showcase 3x3 photos. The beauty of double-sided paper is that the top photo mat also provides a beautiful background to the "25" on the front. I also used my snowflake punch, Frosted paper, blue sparkles, and Frosted Stickease to add just a little something extra to the page without taking up too much room.


Here's a couple of close-ups of the embellishments:


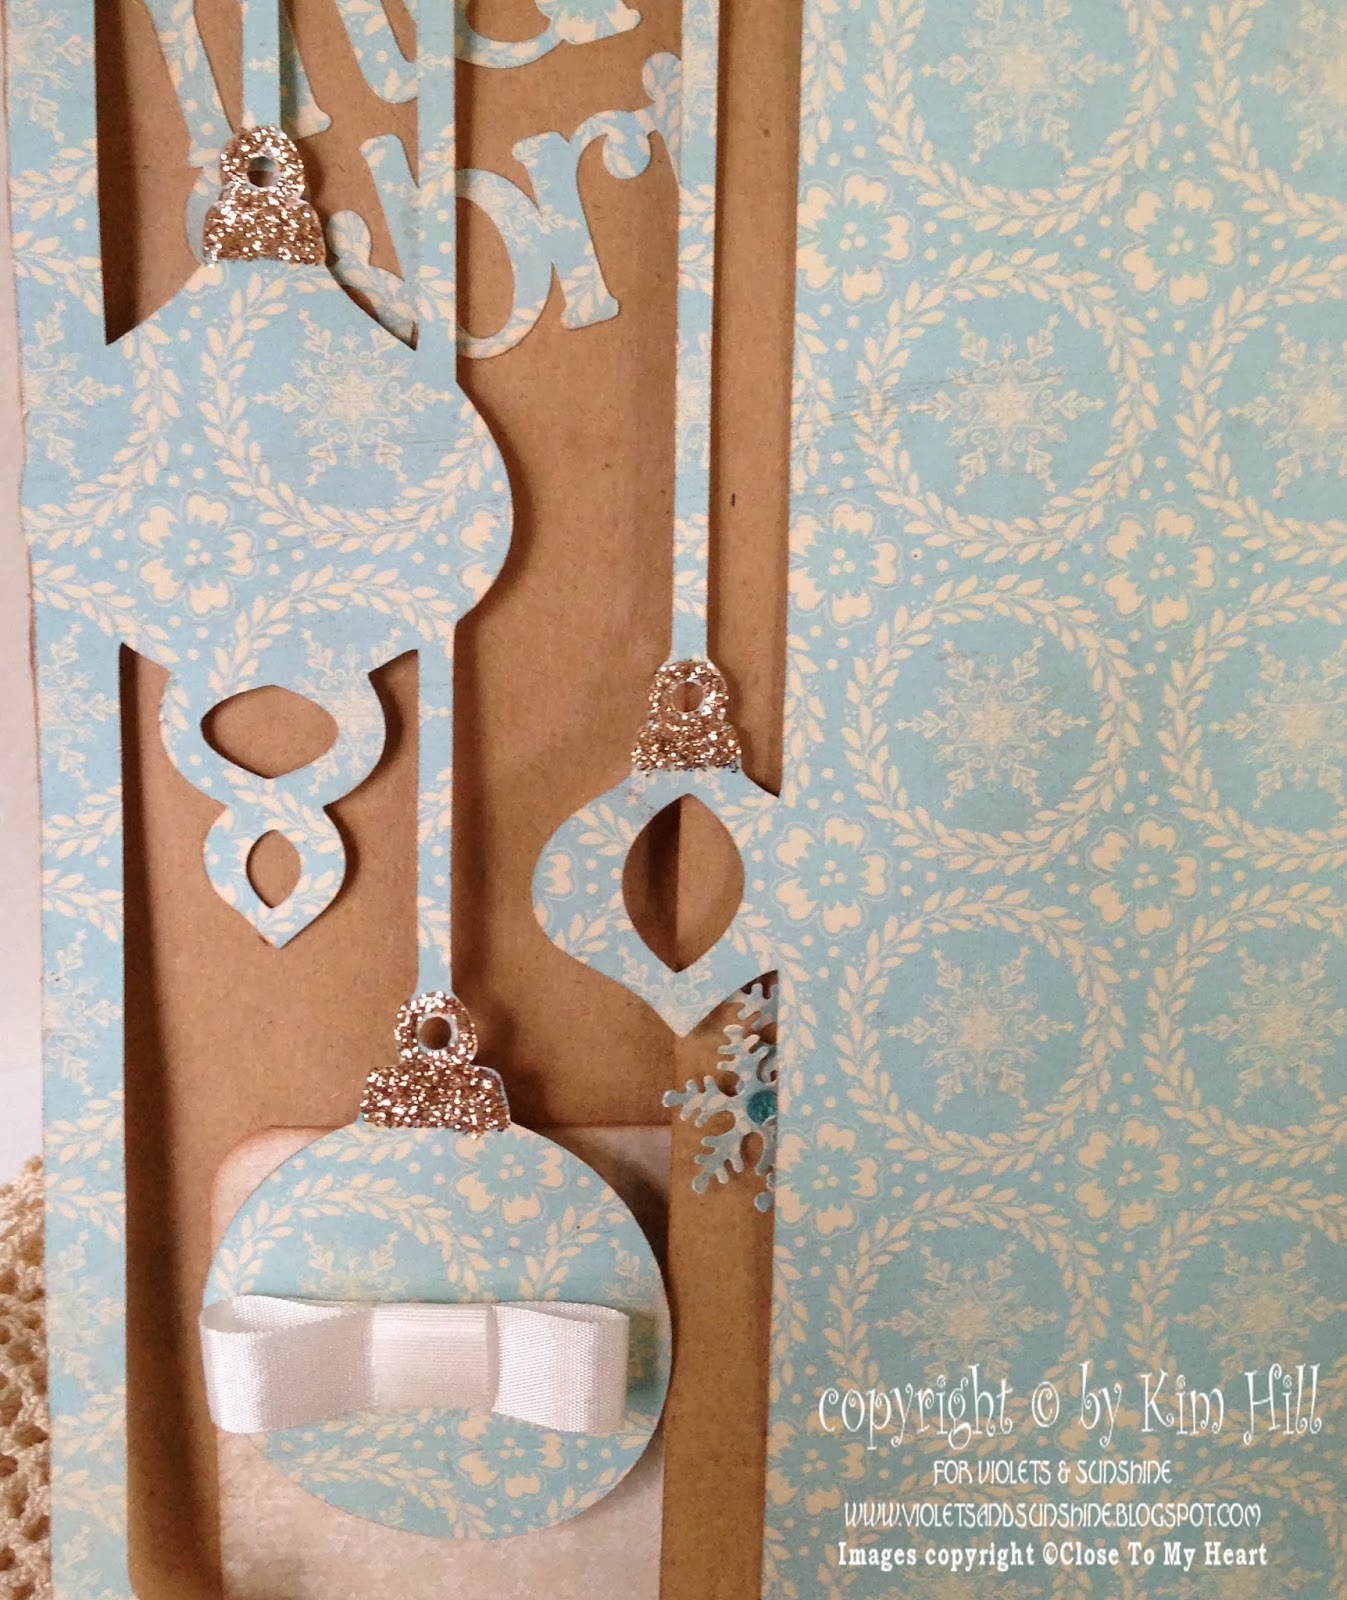
The fourth page is one of my favorite cuts. I decided not to layer it over a base page (which is how it's presented in the Artbooking handbook) so that you could see the page behind it. Also, because the pattern in the paper is rather busy (though beautiful), I didn't think it needed much embellishing. To that end, I added a little Almond Glitz Glitter Gel to the ornaments, along with a sticker and sparkle and some Color Ready Seam Binding Ribbon. I also inked around the edges of the page and the ornaments with Saddle Exclusive Ink to make them pop against the background of the next page.


Here are some close-ups of the ornaments:


Here is the back side of the page. I think this is my favorite pattern in all the Frosted papers (though it's very hard to choose). Again, I kept the embellishing to a minimum in order to let the paper speak for itself.

Okay, so one last page before we go today. The fifth page is a standard base page cut from Frosted Turquoise paper (exclusive to the Frosted paper pack).  To embellish this page, I added a holly spring and berries that were left over from cutting another page (which I will show you tomorrow). The holly is cut from Kraft cardstock to which I added Almond Glitz Glitter Gel for sparkle. I layered that on top of a strip of Frosted pattern paper for an elegant and simple bit of embellishment.


Here is a close-up of the holly:


The back of the page is embellished with ornaments and "Believe" all cut from Artbooking. "Believe" was cut from both Colonial White cardstock and Frosted paper. I layered them to help the word pop off the page. The base of the ornaments are cut from Frosted paper and their embellishments are from tan glitter paper. The top ornament is embellished with the "negative" of the embellishment cut and a blue sparkle.


Here are a couple of close-ups:


I hope you are enjoying a tour of the Christmas mini. We'll finish looking at the last of the pages tomorrow. Until then, have a wonderful day!


16 December 2013

A Christmas Mini (part 1)


Hi All! As promised yesterday, we're back to take a look at the inner pages of the Christmas Mini Album. Today we will be looking at the first 2 pages of the album. All of the pages were cut at 10 inches using the Cricut Artbooking cartridge by Close To My Heart. (By the way, you can find these pages on the "o" and "p" keys.) Let's take a look:


The first page is cut from Frosted Grey cardstock (available exclusively in Close To My Heart's Frosted  paper pack). This page is actually a full size page (roughly 10 x 8 inches) with "december" cut on the edge. However, I cut it down to allow the "december" cut to be protected by the covers (which are 2 full size pages). I inked around the page in Saddle Exclusive ink and added a strip of Frosted paper for photos and/or journaling. To make it more interesting (and to bling it up a bit), I popped up a snowflake from the Frosted Stickease assortment and added a light blue sparkle to the middle. A strip of Silver Shimmer Trim and part of a zip strip from Frosted finish the page off nicely.


For the back of the page, I added another zip strip from Frosted and layered two 3 x 4 inch photo folders on top. Each folder is cut at 3 x 8 inches and folded in half. I rounded the corners and inked the edges with Saddle Exclusive ink. And voilà, room for 6 pictures on one undercut page. :-)


The second page is full sized and cut from Kraft cardstock. It's the most basic page in the album. To dress it up, I cut an overlay from Frosted paper and adhered it to the base page. I added two 3 x 4 inch photo mats (also from Frosted), and cut this cute little reindeer from tan glitter paper. (Love the glitter paper!) I inked around the edges of the base page and photo mats with Saddle Exclusive ink. Here's a close-up of the reindeer:


Cute, huh?


I kept the back of the page very simple. I like to journal directly onto Kraft cardstock, so I just added a couple of photo mats. "merry & bright" is the title cut for this album, so I left my Cricut at 10 inches and it was perfectly sized. Here's a close-up:


The cute little bird on the "t" is from the Frosted Stickease assortment.

And so there you have the first two pages of the mini. Thanks so much for stopping by! Tune in tomorrow to see more of the album.


15 December 2013

Have Yourself a Merry Little Christmas….


Hi All! This is a bit of a bittersweet post because it's the last time I get to play in the Rose Blossom Garden. Head gardener, Brenda Rose, has decided to change things up a bit and the Rose Blossom Garden will be closing down at the end of the year. On the bright side, Brenda and all the gardeners will still be providing lots of inspiration on their blogs, so I'm providing a list for you at the end of this post in case you want to start following any or all of them.

Now on with the project. It's December so that can only mean…BEACH THEME! Okay, just kidding…It's CHRISTMAS TIME! Bring on the tinsel and flurries! So, in keeping with the theme, I pulled out my Cricut, popped in the Artbooking cartridge and created a (sort of) mini album. (It's 10 inches high, so I'm not sure it counts as a mini….) Anyway, let's take a look:

I cut the album at 10 inches (as recommended in the cutting guide). As usual, the cartridge did all the math for me. (Love that!) The covers are cut from chipboard and covered with Close To My Heart's Frosted paper. I cut the covers from chipboard as standard pages and then cut four pages to cover them--one for each side of the chipboard. Super easy! I inked around the edges of the covers pretty heavily using Saddle Exclusive ink. To decorate the cover, I cut 2 snowflakes cut from Colonial White cardstock using the Artbooking cartridge (I left my setting at 10-inches), and then used my favorite snowflake punch to punch out Frosted and tan glitter flakes. I used more glitter paper, a scrap from Frosted, and part of a sticker from the Frosted Stickease assortment for banners, and then cut out "Merry Christmas" twice at three inches using the Artiste cartridge. "2013" is cut at one inch using the font on Artbooking. I used Colonial White cardstock and Frosted paper for both parts of the title. I also added Almond Glitz Glitter Gel to "Merry Christmas" to make it sparkle. (It matches the tan glitter paper perfectly!)

I used bookbinding rings to bind the book and added Slate Satin Polka Dot Ribbon to each ring to make them a little more fun. To make the rings even more festive, I added some jingle bells from my stash.

Here are some close-ups:


And here, again, is the cover:


I also used Artbooking to cut the inner pages of the book, but more on those tomorrow. 

I hope you enjoyed a peek at my Christmas Album for 2013! And I hope you've had a ball playing with us in the Rose Blossom Garden. We sure had fun hosting you! Remember, for more inspiration and just plain fun, visit my über-talented and slightly wacky (in a fantastically fun way!) fellow design team members:
See you tomorrow with more of the mini!

Merry Christmas!